
多田
Lexical PlayGroundから仕組みを調べてみた
LexicalEditorの概要
何ができるのか
playGroundに存在する機能は、すべて使用することができます。
- 基本的なテキスト装飾(太字、斜体、文字色変更、マーカー)
- ブロック要素(リスト、コードブロック、インデント)
- マークダウン
- テーブル
- アンケート機能
- 埋め込み要素(ツイッター、youtube,figmaなど)
- 画像挿入(コピペ含む)
- ハッシュタグ
- メンション
- 音声入力
上記は一例で、かなり多機能なので実際には必要な機能(プラグイン)のみimportして使用することになります。
特徴
公式で推されているのが3つあります。
エディターの状態を常に監視できる
アクセシビリティ対応
具体的には、画像などに読み上げ用のテキストを設定することができます。
動作が早い
LexicalEditorの仕組みについて
エディタの状態管理
LexicalEditorでは、エディタの状態を、EditorStateと呼ばれるJSON形式で管理しています。
DBなどに保存する際もJSONで保存し、JSONをEditorコンポーネントで読み込むことで画面に表示することができます。
また、それぞれの要素(テキスト、リストなど)のことをNodeとして管理しています。
PlayGroundの最初の2ブロックを例に、EditorStateの中身を見てみます。
Welcome to the playground
In case you were wondering what the black box at the bottom is – it's the debug view, showing the current state of the editor. You can disable it by pressing on the settings control in the bottom-left of your screen and toggling the debug view setting.
はじめに見出しがあり、その後は引用ブロックになっています。
PlayGroundの下部の黒背景の部分は、Editorの状態をリアルタイムで反映しています。
文章を選択すると選択範囲が>で囲まれるため、リアルタイムで監視されていることがわかると思います。
また、Editorの構成はツリー状で管理されています。
トップにrootがあり、その後の要素(=Node)は独自の番号が振られ、リストなどは入れ子になっています。
 root
  ├ (122) heading
  | └ (120) text  "Welcome to the playground"
  ├ (127) quote
  | └ (125) text  "In case you were wondering what the black box at the bottom is – it's the debug view, showing the current state of the editor. You can disable it by pressing on the settings control in the bottom-left of your screen and toggling the debug view setting."
PlayGroundでエクスポートを行うと、EditorStateがJSON形式でエクスポートできます。
逆に、EditorStateをimportすれば即座にEditorに反映することができます。
EditorState
{
    "editorState": {
        "root": {
            "children": [
                {
                    "children": [
                        {
                            "detail": 0,
                            "format": 0,
                            "mode": "normal",
                            "style": "",
                            "text": "Welcome to the playground",
                            "type": "text",
                            "version": 1
                        }
                    ],
                    "direction": "ltr",
                    "format": "",
                    "indent": 0,
                    "type": "heading",
                    "version": 1,
                    "tag": "h1"
                },
                {
                    "children": [
                        {
                            "detail": 0,
                            "format": 0,
                            "mode": "normal",
                            "style": "",
                            "text": "In case you were wondering what the black box at the bottom is – it's the debug view, showing the current state of the editor. You can disable it by pressing on the settings control in the bottom-left of your screen and toggling the debug view setting.",
                            "type": "text",
                            "version": 1
                        }
                    ],
                    "direction": "ltr",
                    "format": "",
                    "indent": 0,
                    "type": "quote",
                    "version": 1
                }
            ],
            "direction": "ltr",
            "format": "",
            "indent": 0,
            "type": "root",
            "version": 1
        }
    },
    "lastSaved": 1689304794624,
    "source": "Playground",
    "version": "0.11.2"
}
かなり入れ子になっているので分かりづらいと思うのですが、rootの下にNodeごとに{children:[]}が作成されていきます。
DOMのstyleなどの情報も、childlenの配列に"style"要素として設定されます。
仕組みについて簡単に図にすると上記のようになります。
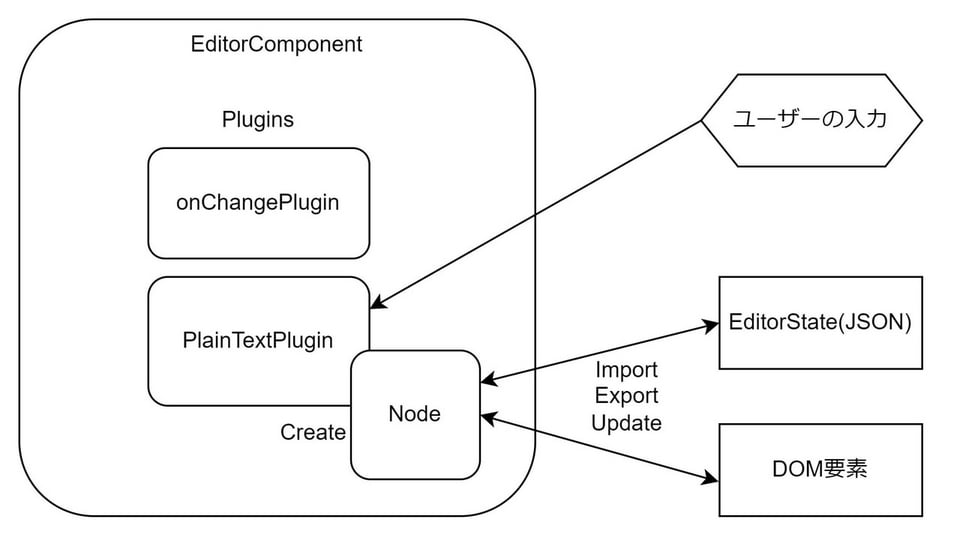
ユーザが入力するとPluginがどういったNodeかを感知
PluginがNodeを作成する
NodeをEditorStateに挿入する(JSON形式で管理)
DOM要素に反映される
プラグインとNodeは対応しているため、セットでimportとする必要があります。
例えば、メンションプラグインを使いたい場合は、メンションプラグイン内でメンションNodeを呼び出しているため
メンションNodeも定義する必要があります。
使いたいpluginがimportできない場合もあるので、手動でGithubからコードを拝借して定義することもありました。
参考:実際のソース
※長いので省略しています。雰囲気だけ味わってください。
LexicalEditor.tsx
const initialEditorState = await loadContent();
const editorStateRef = useRef();

<LexicalComposer initialConfig={{
  editorState: initialEditorState
}}>
  <LexicalRichTextPlugin />
  <LexicalOnChangePlugin onChange={editorState => editorStateRef.current = editorState} />
</LexicalComposer>
OriginalPlugin
export const INSERT_ORIGINAL_COMMAND: LexicalCommand<string> = createCommand();

export default function OriginalPlugin(): JSX.Element | null {
  const [editor] = useLexicalComposerContext();

  useEffect(() => {
    if (!editor.hasNodes([OriginalNode])) {
      throw new Error('OriginalNode: OriginalNode not registered on editor ');
    }

    return editor.registerCommand<string>( // nodeの追加が指示されたことを感知
      INSERT_ORIG_COMMAND,
      (payload) => {
        const originalNode = $createOriginalNode(payload); // nodeの作成
        $insertNodeToNearestRoot(originalNode); // EditorStateにnodeを追加

        return true;
      },
      COMMAND_PRIORITY_EDITOR,
    );
  }, [editor]);

  return null;
}
EmojiNode
export class EmojiNode extends TextNode {
  createDOM(config: EditorConfig): HTMLElement {
  }

  updateDOM(
    prevNode: TextNode,
    dom: HTMLElement,
    config: EditorConfig,
  ): boolean {
  }

  static importJSON(serializedNode: SerializedEmojiNode): EmojiNode {
    const node = $createEmojiNode(
      serializedNode.className,
      serializedNode.text,
    );
    return node;
  }

  exportJSON(): SerializedEmojiNode {
    return {
      //
    };
  }
}

export function $createEmojiNode(
  className: string,
  emojiText: string,
): EmojiNode {
  const node = new EmojiNode(className, emojiText).setMode('token');
  return $applyNodeReplacement(node);
}
まとめ
Editorを実装する際はどうしても独自カスタマイズする必要が出てきますが、仕組みがわかっていないとなかなか難しい作業になると思います。
LexialEditorは公式ドキュメントを見れば基本的な実装はできるものの、実際に独自プラグインを作成する際に苦戦した覚えがあるので、今回まとめてみました。